Japanese Fried Dough With Beef Inside
As the proper noun implies, Curry Bread is literally a bread filled with Japanese curry. The golden crust is crispy and chewy inside from the deep-frying. Meanwhile, the savory filling is rich, flavorful, and fulfilling. If yous are a Japanese curry lover, you should make this delicious bread at dwelling.

About Back-scratch Breadstuff
Since Japanese back-scratch is a dish that has a very special identify in Japanese hearts and their cuisine, there is absolutely no doubt that Curry Bread is also a huge hit in Japan. You tin find Curry Bread, also known as Kare Pan (カレーパン), in nearly bakeries and convenience stores throughout Nihon.
Back-scratch Bread is clearly a variation of the original Japanese curry dish. It uses the aforementioned ingredients, such equally potatoes, onions, carrots, meat, and Japanese curry roux. Nevertheless, instead of serving information technology on top of steaming rice, the curry is put inside the staff of life dough, lightly covered in panko breadcrumbs, and so deep-fried till golden brown.
Do non forget to check out my Japanese Chicken Back-scratch recipe. The recipe features how to make the original Japanese curry dish to serve with rice.
Most Japanese Curry Roux
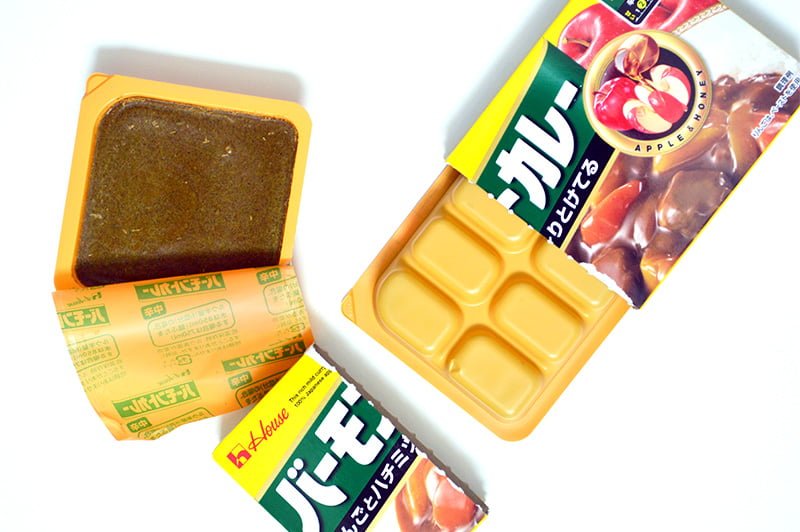
Nowadays, back-scratch sauce is nearly commonly fabricated from instant curry roux, which is available in block and powder forms. It is a staple of Japanese households and you can find Japanese curry roux at supermarkets across Japan. You can observe them sold online. I used the Vermont curry mix, which has a milder sense of taste.
I must say the prepackage Japanese curry roux is a life safer. The solid roux is already made with all flavor packed within which melts easily in hot liquid. Yous just demand to cook vegetables and meat in water, after which the solid chunks of roux are added to the broth. You tin can usually find the prepackage Japanese curry roux in 3 levels of spiciness – mild, medium, and hot. I personally prefer the balmy one considering information technology has a sweeter season.
How to Make Back-scratch Bread
This Back-scratch Bread is amazing with a calorie-free and crispy chaff with a soft and moist interior. I could non believe that simply putting curry within crispy deep-fried bread can elevate curry to the next level. Let me guide footstep by step how I fabricated these tasty Curry Staff of life from scratch.
1. Make the dough
Beginning by measuring all of the dry ingredients into a big mixing basin. Then, combine the warm milk, butter, granulated sugar, and yeast until the butter and sugar are fully melted. Mix the flour, milk mixture, and egg together until they course a coarse dough.

Nosotros need to knead the dough to create structure and strength in the dough. The floor is combined to form gluten, which is responsible for creating the elastic texture in the dough.
Kneading the dough tin can be performed using easily or with a dough claw in a stand up mixer. Kneading for 10-12 minutes past mitt or 8-10 minutes in a stand up mixer are the general standards. I used my hands to knead the dough because I wanted to develop a sense of how the dough should look and experience during the kneading. It gives me a real feel for the transformation that takes place when the flour and h2o are combined.
To knead the dough using hands, fold the dough over and over on itself with your hands, pressing it confronting a tabletop and continuously working it until the dough is smooth and not sticky to your hand. You tin can as well give a poke test to the dough to test if it is done or not. If the indentation fills dorsum speedily, you are good to go. If it stays, continue kneading. Moreover, the kneaded dough should be stretchable into a sparse sheet between your fingers to check if the gluten is well-developed.
2. Residue the dough
Once the dough is stretchy and smooth, place the dough into a basin, cover with a kitchen towel, and put it somewhere warm for almost 60-90 minutes for the dough to ascension and double in size. Resting allows the gluten proteins to align themselves. It also gives the yeast time to eat upwardly the broken down starches from the flour and expel carbon dioxide and alcohol.

three. Brand the filling
While waiting for the dough to double, make the filling immediately. You volition need time to absurd off the filling so that it volition exist set up to put inside the dough.
The all-time part about making bootleg curry bread is that you can stuff the staff of life with your favorite curry. If you do not accept Japanese back-scratch at home, any curry volition do. I guess it would however taste good without the curry.
To make the filling, stir fry the finely diced onion, potatoes, and carrot until cooked. Add ground beefiness and cook until it is fully cooked. Add soy sauce, ketchup, and Japanese curry roux along with a mixture of cornstarch water. Do non forget to break downwards the curry roux with wooden spatula while mixing to make sure it is well combined. Make sure your curry filling looks thick consistency as you volition be bundling up the curry filling into the dough. If your filling is as well runny, the filling volition run over the dough and make the dough difficult to seal.

You can also utilise the leftover curry, but it has to be in thick paste-similar consistency. If the leftover back-scratch is too soupy, only reheat it and add some cornstarch. Start with combining 1 tablespoon of cornstarch and an equal amount of water in a pocket-size bowl. This is you slurry. Pour it into the hot, simmering curry that you want to thicken.

four. Shape the dough
One time the dough has doubled in size, punch it down. Plow it onto a lightly floured surface and knead information technology by hand to release any air bubbles in the dough. And then, divide the dough into 16. I used a kitchen weight scale to brand sure everything comes out in same size. My overall dough weight is 704 grams. So, I got each for 44 grams dough if divided by 16.

Gyre the dough into small balls. Create a smooth surface past pulling all the sides of the ball to the bottom and pinch them together. For the adjacent step, roll a small ball of dough with a rolling pin into rounds about 10 cm / four-inch beyond. Flatten out the edges a little, so that the seam will not be too thick and doughy.
Mensurate the overall weight of the filling and divide it into 16. Mine is 42 grams each, or most one.five tablespoons of curry. Identify the filling into the centre of the circular dough and gather the edges to cover the filling. Pinch the dough to close any seam. You do not want any leakage because it will plow out a mess during frying.


5. Breading the dough
After putting the filling, nosotros are set up to bread the dough with breadcrumbs. Breadcrumbs add together a nice crunchiness to the exterior of the Curry Bread. Firstly, prepare two shallow dishes and put beaten egg and breadcrumbs separately. Driblet the dough into the beaten egg before laying information technology in the breadcrumbs. Turn information technology over and press the breadcrumbs to glaze.

6. Remainder the dough again
Put the breaded dough onto a large tray and comprehend information technology with a kitchen towel. Allow the dough to rest again for xx-30 minutes in a warm environment to ascent before cooking.

7. Fry the bread
Think that if the oil is besides hot, the bread will brownish likewise quickly and the middle may remain raw. Meanwhile, the dough volition absorb a large quantity of oil and be greasy upon cooling when the oil is also cold. Gently transfer the dough ane by one into the hot oil. Go along flipping the dough over to get a nice compatible roundness and encourages initial upwardly expansion and cook for about 4-5 minutes or until golden brown and crispy. Remove from the oil and transfer to the wire rack or paper towels while it cools.

This Curry Bread is admittedly succulent right later it is made. If yous accept leftover, you lot tin can refrigerate and reheat in a microwave.


Tips For Making Curry Bread
Below are some of import tips I learned from making Curry Bread
1. The curry filling should be in thick paste consistency
Brand sure your curry filling looks thick consistency as yous will exist bundling up the curry filling into the dough. If your filling is too runny, the filling volition run over the dough and make the dough hard to seal.
2. Brand the filling ahead
If possible, I recommend making the filling a twenty-four hour period before you make the Back-scratch Staff of life. One time you refrigerate the curry, it will solidify and easier to handle. Just take out the curry when you first making the bread, so it reaches room temperature by the time you fold it up in the dough.
3. Keep the dough covered
The dough should always be covered with a damp kitchen towel or loose plastic wrap with the intention to foreclose the dough from drying out. Roofing the dough also helps to keep some of the warmth around the dough and helps the yeast to rise.
four. Sparse out the edge of the round dough
Subsequently placing the filling at the center of the dough, yous will need to gather the seam from the edges to embrace the filling. Thinning out the edges volition make certain the seam will not be also thick and doughy when you fold and compression the edges.
five. Keep flipping the dough during frying
Continue flipping the dough over to get a nice uniform roundness and encourages initial upward expansion.

More Japanese Curry Recipes
If you love Japanese curry, you should check out these succulent recipes!
- Back-scratch Croquettes
- Spiral Curry Puffs with Japanese Curry Filling
- Chicken Curry Udon
- Chicken Katsu Curry
Source: https://jajabakes.com/curry-bread/
0 Response to "Japanese Fried Dough With Beef Inside"
Postar um comentário